

Let's face it, flat panel HDTVs look cooler when mounted up on the wall versus being sat on a TELEVISION console. A lot of HDTV owners still shy away from having their screens wall mounted, even if they wanted them that method. Well in this post I'm going to share with you how simple it is to mount your own flat panel television on the wall using a retractable TV corner install.
Due to the fact that they require you to discover just one wall stud in which to drill your bolts, retractable corner mounts are probably the most convenient to set up on the wall. Others require bolting into two studs, which suggests more measuring and drilling. As soon as set up, corner wall installs enable you to adjust the TELEVISION screen in 3 dimensions - extending, rotating and tilting. What makes this possible is a single retractable cantilever arm that holds the tv on the front end and is attached to the wall installing plate at the back end. With many models the arm has 3 rotating points, which allow you to tilt and turn your HDTV in practically any direction so that you can get an ideal head-on view of it from any position in the space. Likewise, depending on your seating https://damienclqh715.page.tl/15-Secretly-Funny-People-Working-In-Wall-Mount-Tv-Cable-Box-Solutions.htm plan, it may be better to place the TELEVISION in a corner of the room instead of installing it flat on one wall. Retractable TELEVISION corner wall mounts enable you to do simply that.
First thing to do is ensure you buy a corner-cantilever TV installing set that is compatible with the size and weight of your flat screen tv. You require to collect all the required tools and materials for the task, such as a power drill, drill bit, stud bolts, stud tape, finder or ruler step, pencil, bubble level, and a Phillip's head screwdriver. After you have actually done that and chose where on the wall you wish to position the TV, it's time to get to work.
Let's say you wish to install your 42-inch flat screen LED near a corner so that you 'd be able to pull it out and swing it over into the corner at a 45-degree angle (cater-cornered position). Here are 8 easy steps to get that TV on the wall in no time at all.
Step 1. Find the stud closest to the inside of the corner with your stud finder.
Step 2. Using the install's wall plate (or paper stencil if geared up) and pencil, mark 2 areas for your pilot holes. Check that the wall plate or stencil is level by using the bubble level.

Action 3. Drill pilot holes through the wall into the stud at the pencil marks.
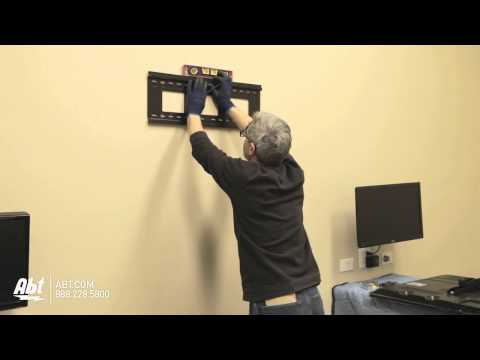
Step 4. Attach the installing brackets or TELEVISION mounting plate onto the back panel of your TELEVISION using the provided screws. Constantly utilize a screwdriver to tighten up, not a power drill.
Step 5. Now it's time to attach your corner mount assembly to the wall. Line up the mounting plate with your pilot holes, and drill two or more stud bolts through it. Tighten up firmly.
Action 6. Once the mount assembly is secured to the wall stud, you may hang the TELEVISION brackets onto the cantilever arm utilizing the bracket hooks.
Step 7. Now swing the TV over into the corner, forming a perfect triangle with the 2 adjoining walls. If done correctly, your corner mount must be totally concealed behind the tv screen.
Step 8. Voila'! Now all that's left is linking your TELEVISION power cable and audio-video devices, and you're done.